
Making Nitro Cold Brew @ Home
Making Small Batch
This is how I started before moving up to large batches in my Kegerator. It's a good starting point, and depending on the kit you get, it can yield approximately 48oz of cold brew, enough for 3-4 days of coffee, depending on the size of the glass you use for dispensing. This is a cheaper investment upfront, but it costs more per glass in the long run due to the cost of cartridges.
Equipment
- Nitro Cold Brew Maker - Amazon Link
- 64oz Mason Jar with coffee filter - Amazon Link
- Nitrogen N2 or Nitrous Oxide N2O Cartridges - Amazon Link
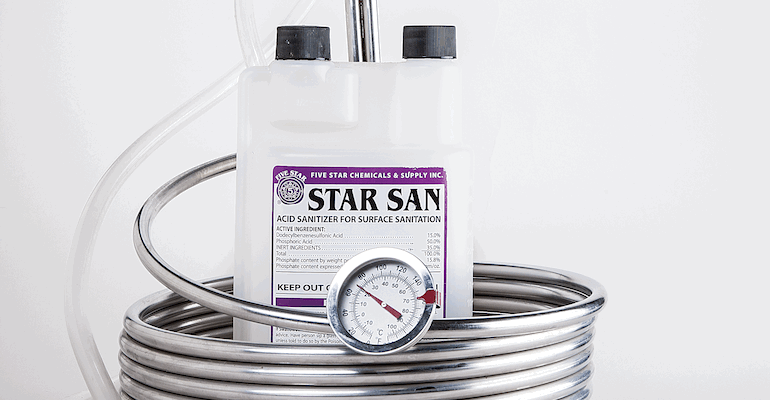
- Recommend: Star San or some other sanitizer
Before starting, clean your mason jar, filter, and lid. I used to put them in the dishwasher on high heat or wash them and use some food-safe sanitizer. This is a smaller batch, so it is not as important to completely sanitize everything, but they need to be clean. You do not want to get bacteria in your coffee, but the batch is not sitting in the container for as long as it would for a large batch, allowing you to finish drinking it.
Once everything is clean, place your coffee filter into the mason jar. Depending on the size of your nitro coffee maker, add the required amount of coffee grounds and water. It is roughly 1 cup of coarse-ground coffee to 4 cups of water, so for 64 oz, you will need 2 cups of coffee. Adjust this to your taste. You will then place the mason jar with coffee in the refrigerator for 12 to 24 hours.
After the coffee has finished brewing, it is time to place it in the nitro maker. Fill the nitromaker with the recommended amount of coffee. For the one linked above, that is 48oz of coffee. Pour the rest into a glass and enjoy a fresh cup of cold brew. Cheers! Attach the maker's lid and spout assembly to the top of the maker. You want this to be tight, but not too tight. Remember this holds the gas in, so it needs to be air-tight. Then, place one of the cartridges into the nitro maker's cartridge adapter and screw it on quickly. As the adapter is tightened, it pierces the cartridge and releases the gas into the coffee. Lightly shake the maker, now full of gas and coffee, for the recommended time and place it in the refrigerator overnight.
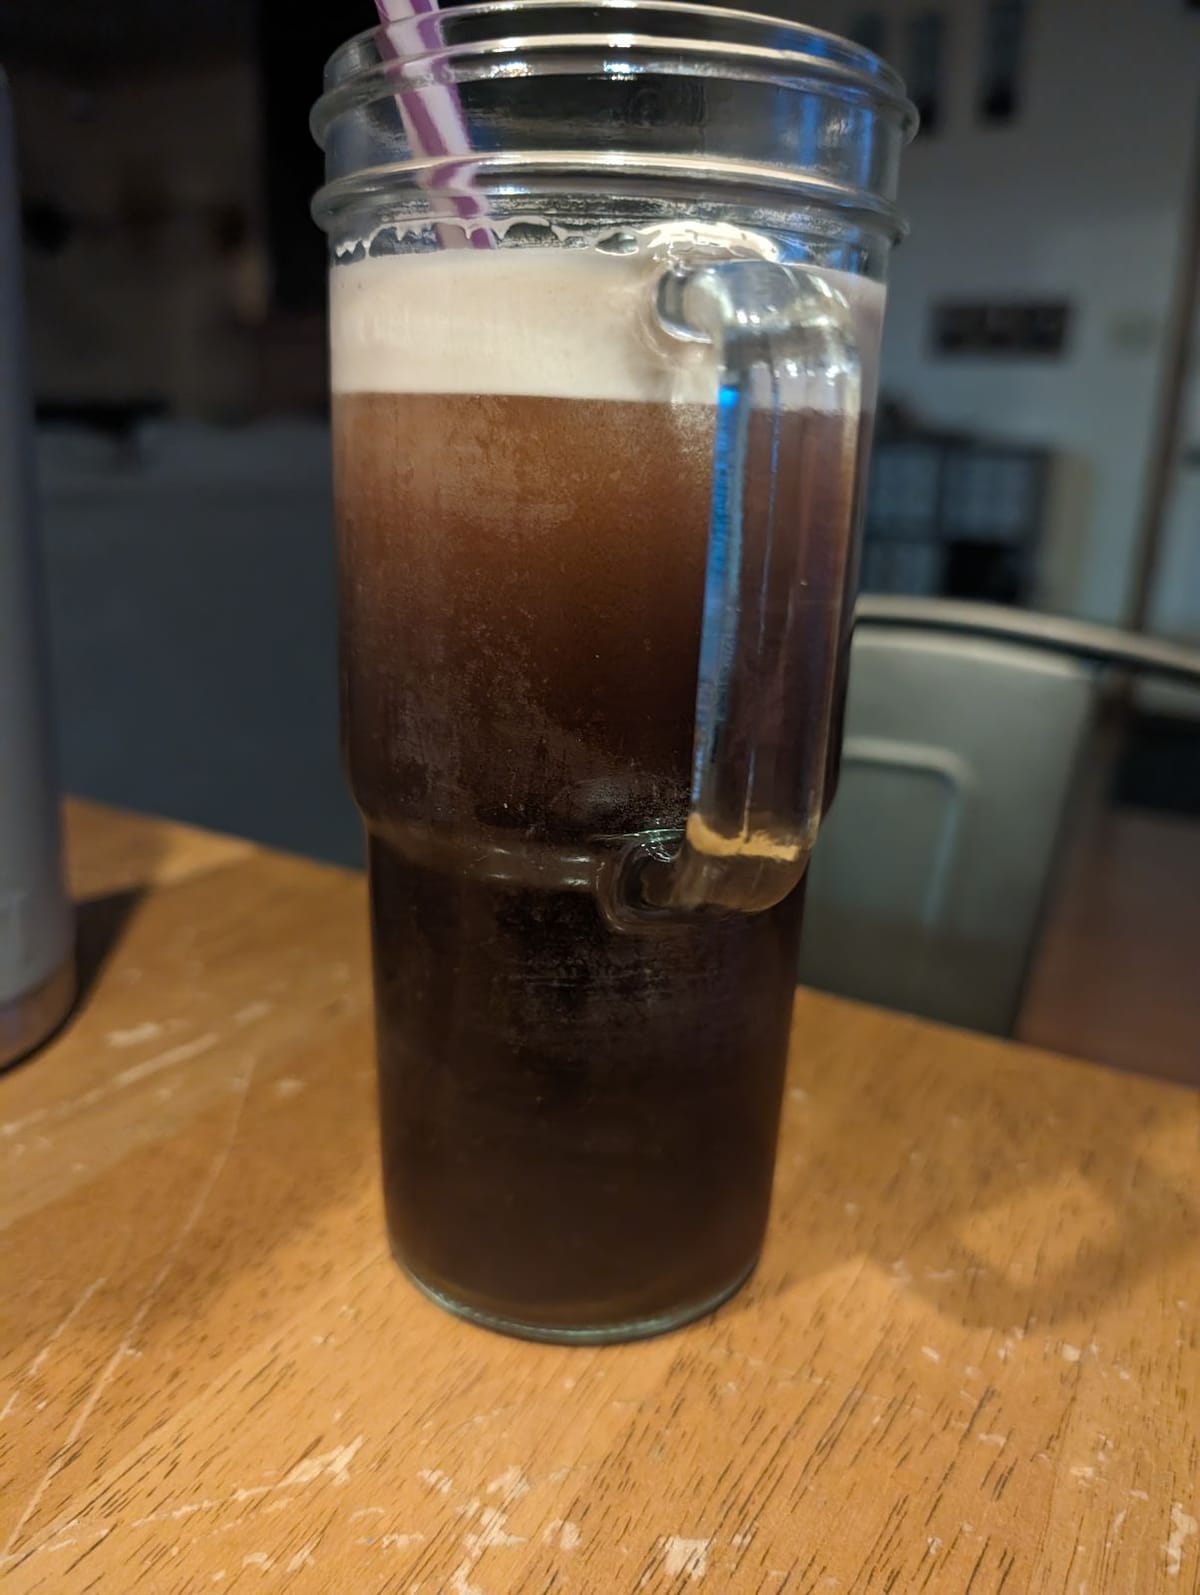
Congrats, you now have nitro coffee.
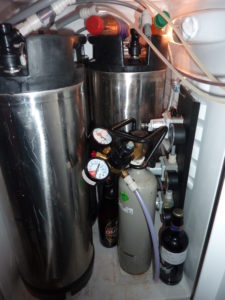
5 Gallon Batches in Keg
Equipment
- Kegerator - Komos 3 tap
- Nito Tap - Linksignificant
- Food-grade Nitro tank - Local Gas Supplier
- Nito Regulator - Amazon Link
- 5-Gallon Ball Lock Keg with fittings - Amazon Link
- Ball lock lid with airstone - Link
- Keg Seals (buy a few to have on hand just in case)
- Brewing Bucket 5-Gallons with spigit - Amazon Link
- Brewing Bag or Fine Mesh Hop Screen - Brewing Bag / Hop Screen
- 2 lbs Coffee of Choice (depending on your preferred strength of coffee)
- Star San - Amazon Link
- Hose and fittings, I recommend Duotight
The initial investment is pretty significant, but you can also use the kegerator to make carbonated water or soda if you are not a beer person. Additionally, buying the gas tank and nitrogen the first time is expensive because you have to purchase a gas cylinder along with the initial 5 pounds of nitrogen. Afterwards, you are simply exchanging the tank for another tank of gas (~$45). A single tank is suitable for several batches of coffee as long as you do not have a leak in your system.
Kegerator Setup
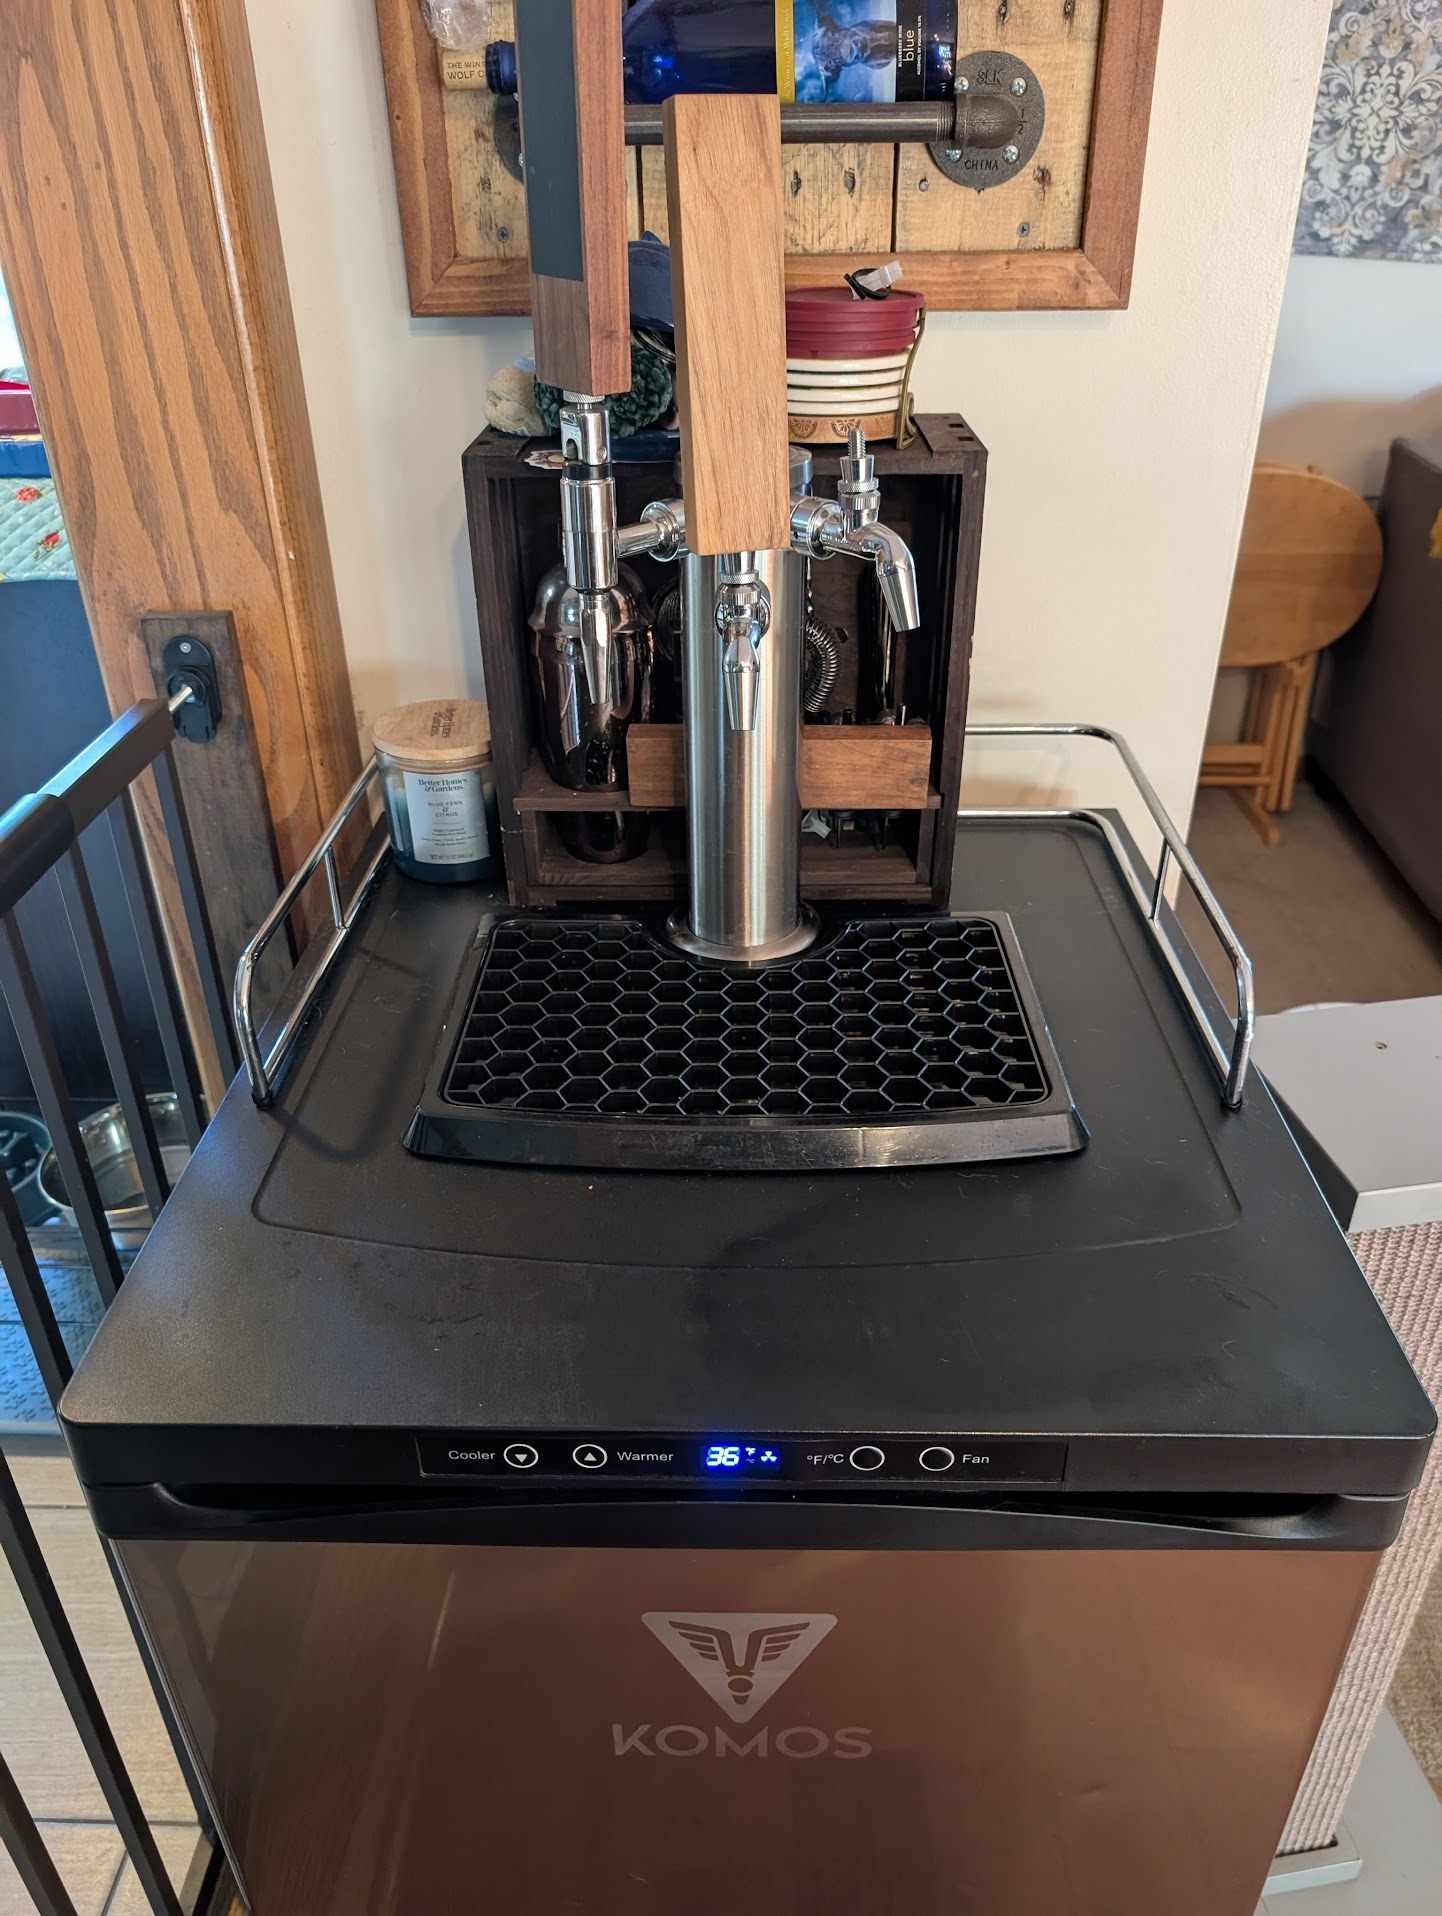
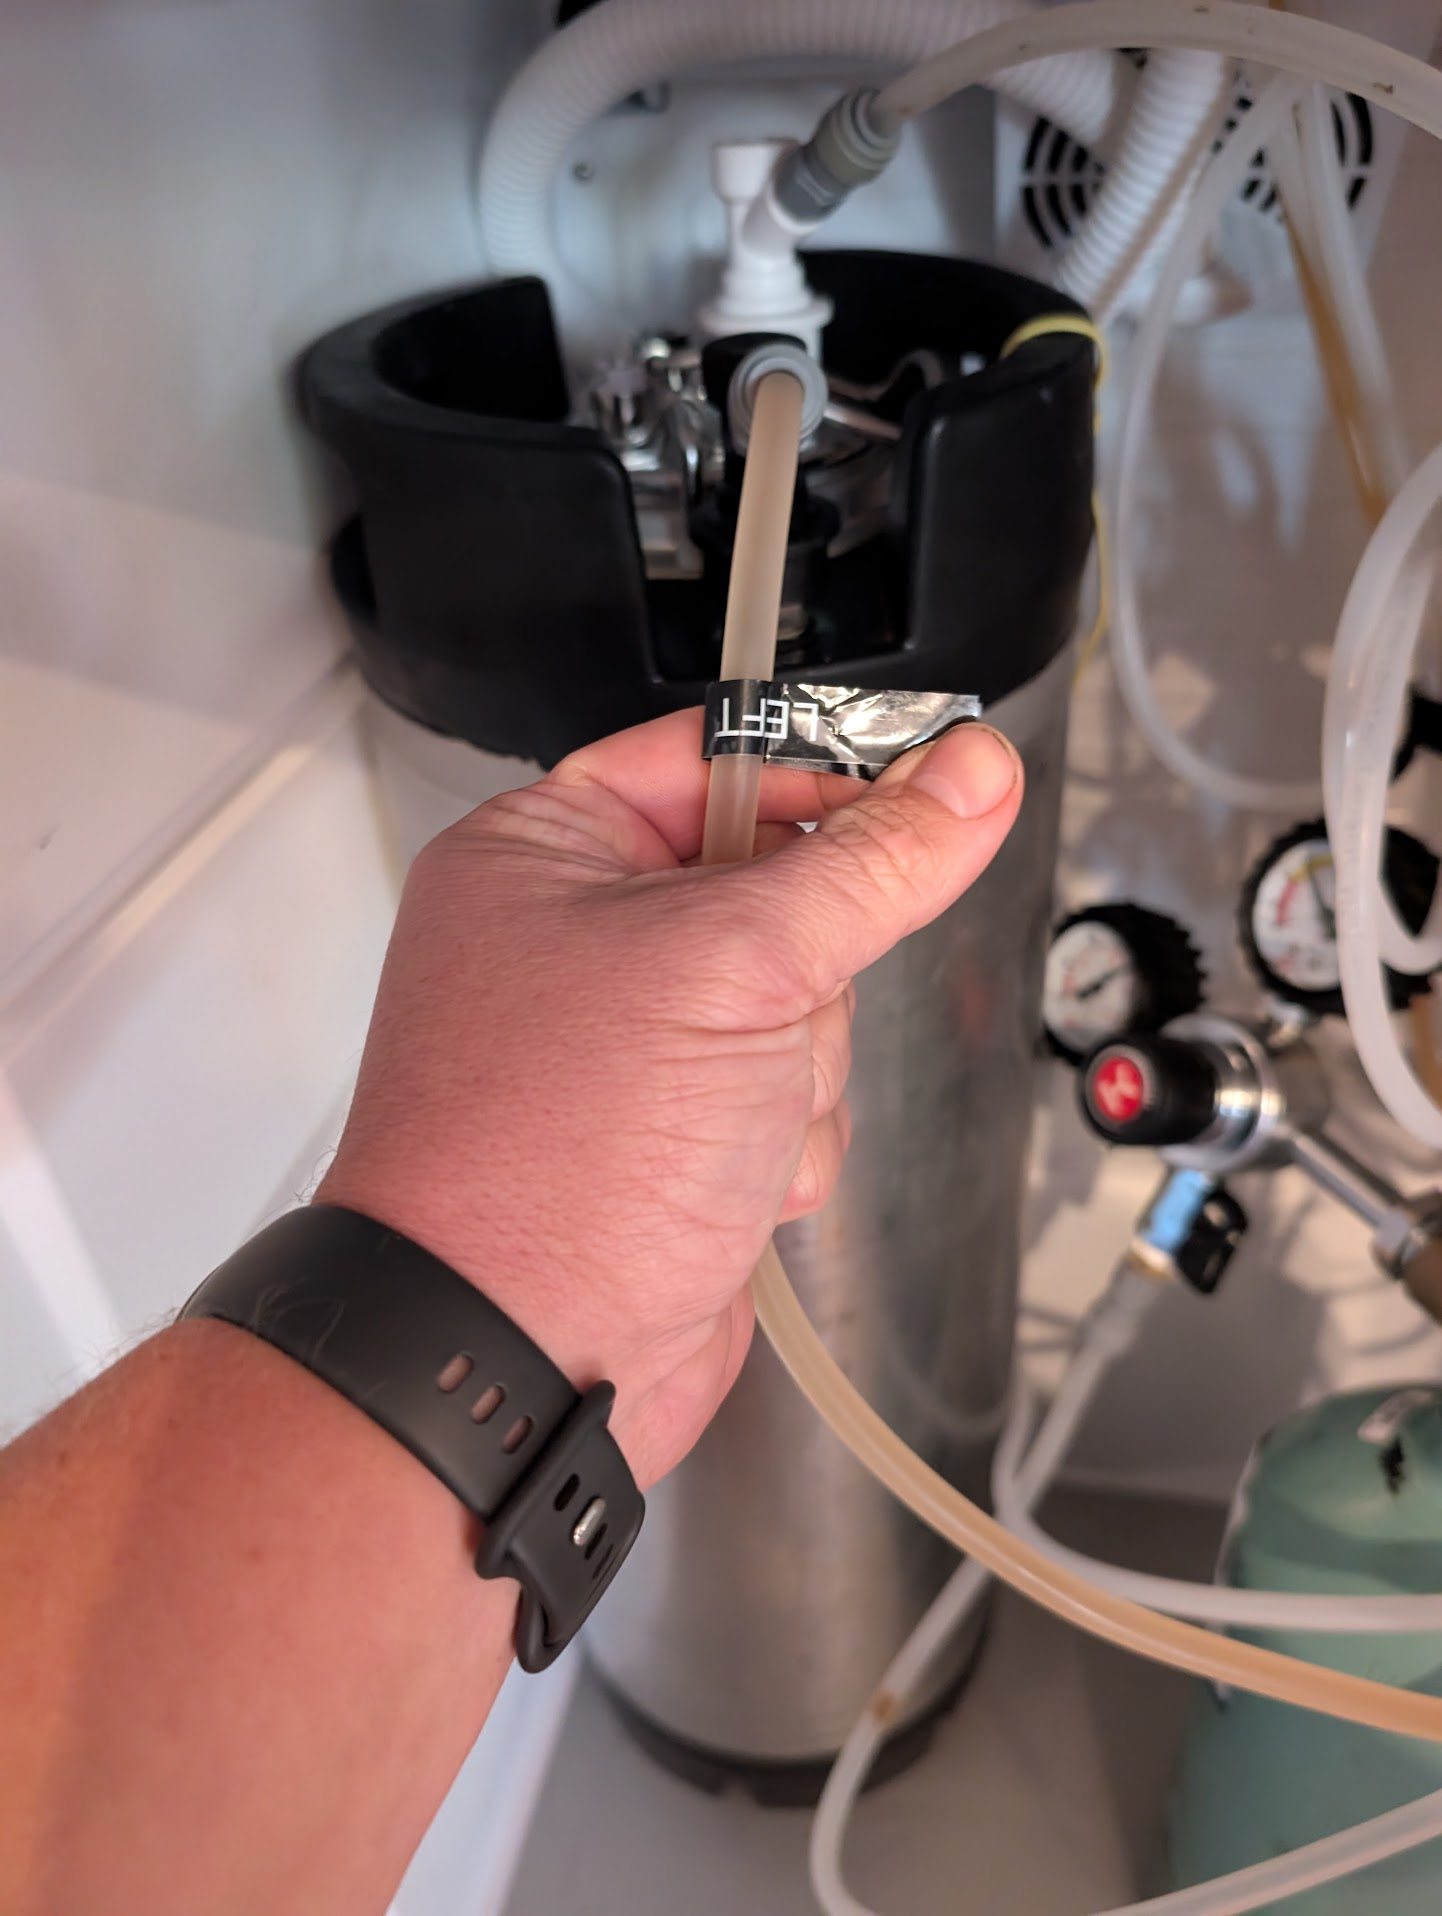
When setting up your kegerator, label the lines inside or use colored electrical tape to identify which line corresponds to each tap. I used a label maker to label them as 'left', 'center', and 'right'.
I set the temperature to 36°F. Depending on the accuracy of your kegerator, you may need to make slight adjustments so that the coffee does not freeze in the lines. Speaking of the lines, I highly recommend adding check valves to the line(s) coming from the regulator to the keg. If your tank runs out of gas, you do not want liquid backflowing into the regulator.
Making Coffee
Before starting, sanitize your bucket, bag, or hop screen with Star San. Follow the directions on the bottle. After sanitizing the bucket, dump the sanitizer from the bucket into the keg and shake it with the lid on. This will sanitize the keg after the coffee is finished brewing. The foam is safe as long as the product is mixed according to the instructions on the packaging.
Add your coffee to the bag or hop screen and then fill the bucket with water. I use 2 lbs of coarse-ground coffee for a 5-gallon batch. I use water from our well, but you can also use reverse osmosis (RO) or bottled water if you prefer. You want to add a little more than 5 gallons because you will lose some to the coffee grounds.
Place a lid on the bucket and store it in the refrigerator or your kegerator for at least 8 hours, or longer for a stronger coffee flavor.
Kegging the Coffee
Once your coffee is finished brewing, it is time to add it to the keg. Shake the sanitizer around again to ensure the whole keg is coated, then discard it. Remember, as long as the product is mixed correctly, the foam is safe, so do not rinse the keg.
Once the coffee is transferred into the keg, place the lid with the air stone on it and seal it. Ensure that the gasket is seated correctly and evenly clamped down. You will want a good seal since we will be adding 45-50 PSI of nitrogen gas to the keg.
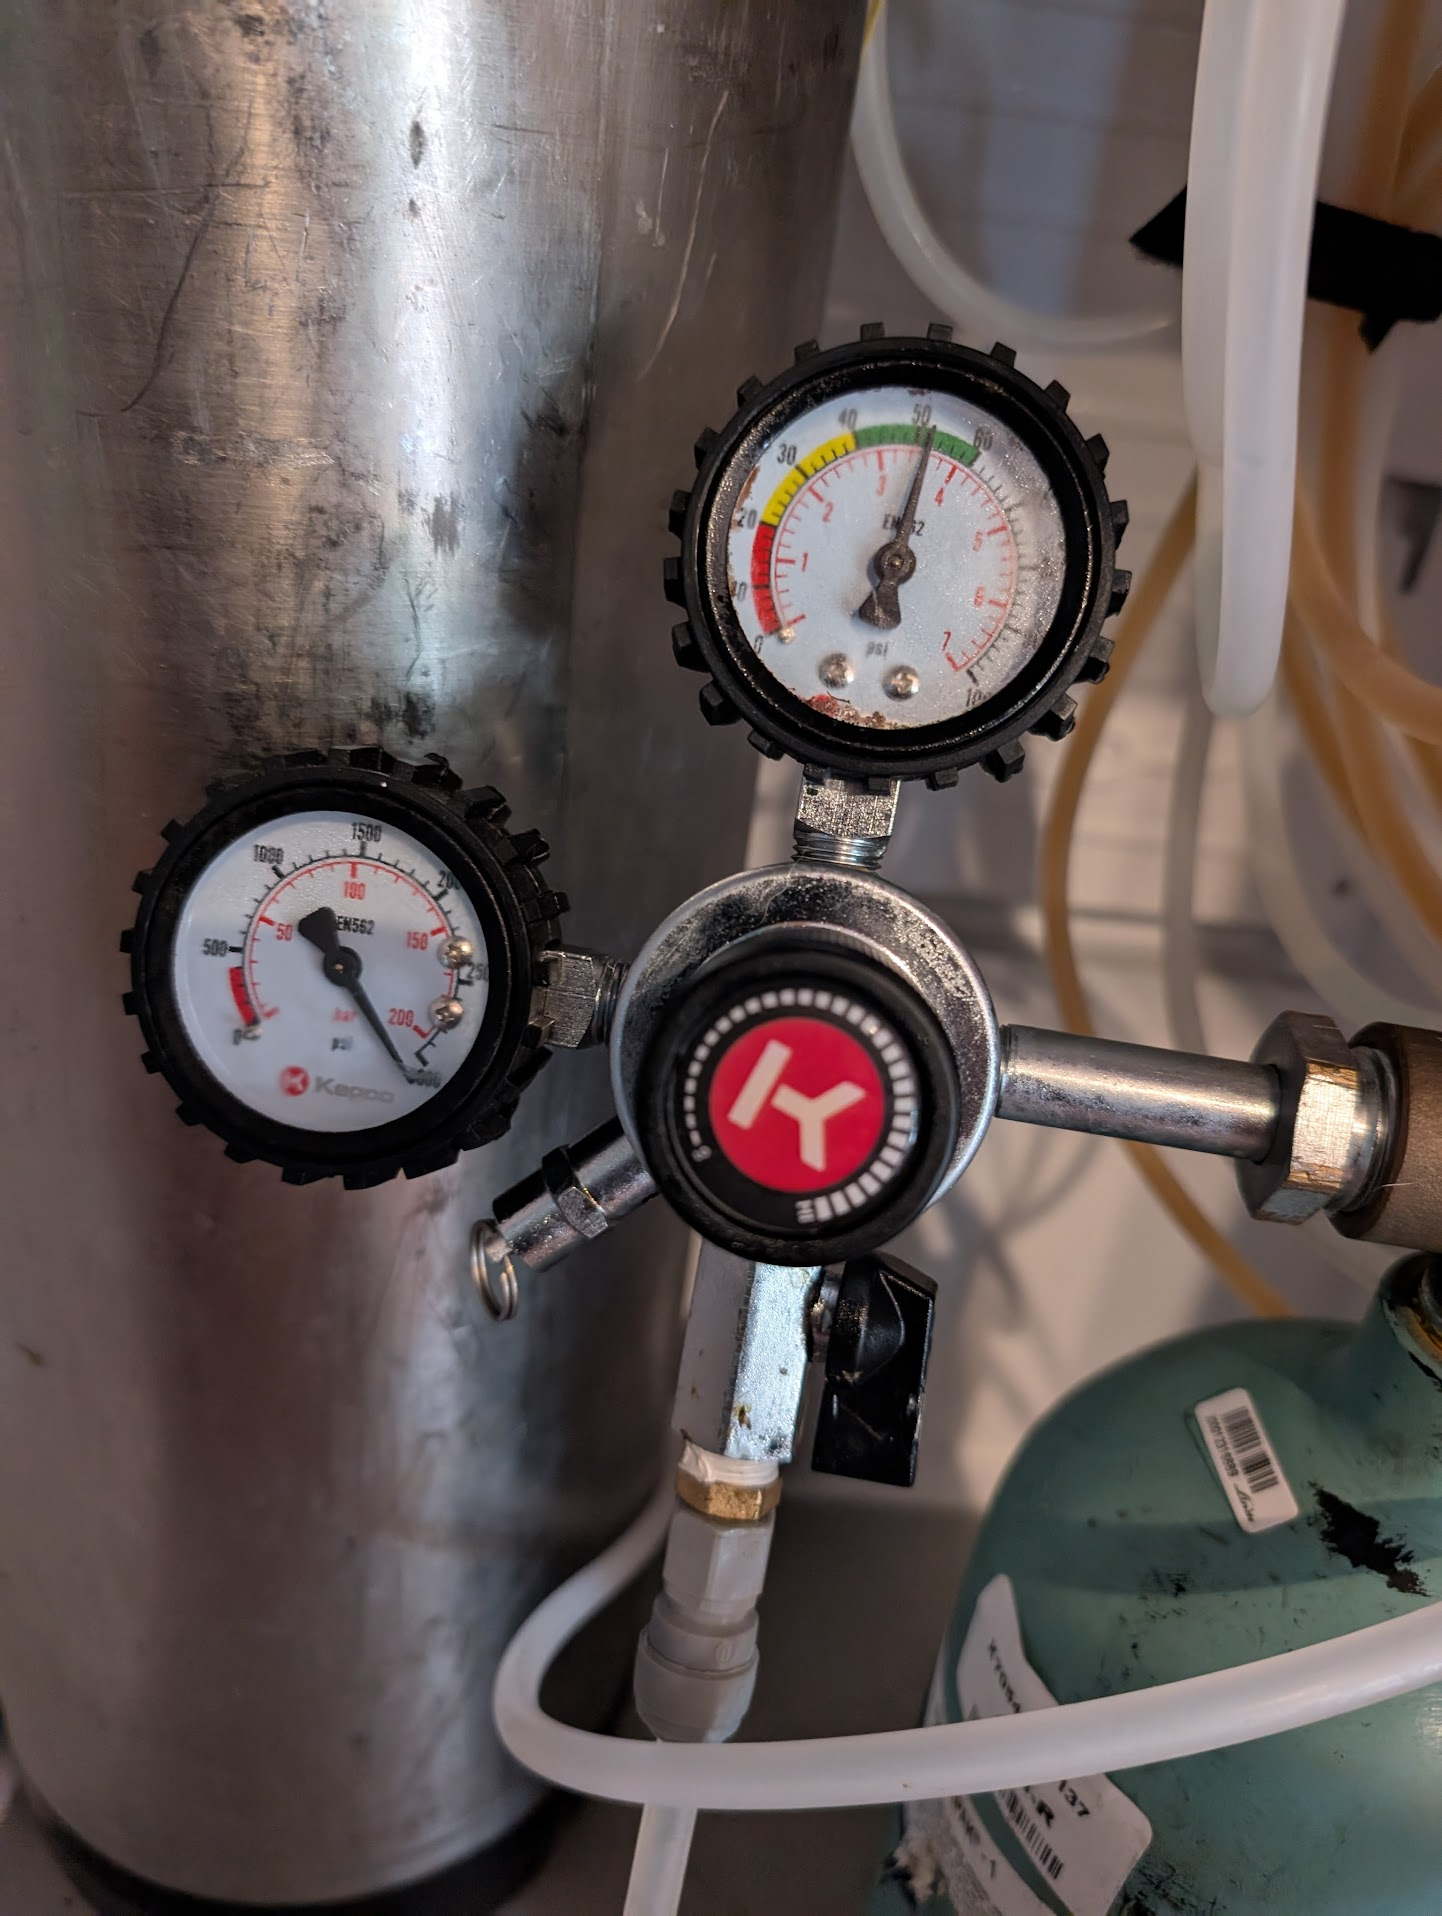
Once sealed, place the keg in the kegerator and attach the liquid line that is connected to the NITRO tap to the OUT post on the keg. Then attach the gas line to the carbonation inlet (the one on the lid). Remember, these are color-coded: white for gas and black for liquid.
Once all your connections are made, it is time to start adding gas to the keg to pressurize it and make your coffee silky smooth to drink. Turn the gas to approximately 20 PSI and use a soapy water solution in a spray bottle to check for leaks. I typically use Star San in a spray bottle for this since it foams. Check all the connections for the gas tank, regulator, and keg. If anything is not sealing properly, tighten the connections. If the lid is not sealing correctly, turn off the gas and purge the keg by pulling the pressure release valve on the top of the lid to release the gas in the keg, then reseat the lid. If you are still having trouble, get some food-grade lubricant or a new seal.
O
After everything is sealed, you can increase the pressure of the keg to serving pressure slowly over the next hour or so. I do not do this. Instead, I turn the gas to about 50 PSI and shake the keg slightly to dissolve the gas. As long as nothing is leaking, you can close up the kegerator, and everything will be ready to serve after a few hours. However, it generally takes a day or two to get really good. Shaking the keg periodically helps speed up the process.
Troubleshooting/Notes
Gas Leaks
Number 1 Rule make sure everything is tight and check for leaks after pressurizing the coffee.
If you are worried about leaking gas, which I have had happen, you can turn the gas off at the gas tank and verify that it's holding pressure the next day. I typically turn the gas back on after serving a few glasses so that the keg stays at pressure, but I do not have to worry about it leaking out if I have a small leak.
Coffee Does Not Cascade
This is usually caused by a gas leak or you do not have enough gas pressure. Turn up the pressure you want between 45 to 50 PSI of gas.
Flat or Watery Taste
Increase coffee-to-water ratio or adjust steeping time.
Nothing But Foam From Tap
This happens if the liquid has too much gas in it or your keg is empty. Check the keg for liquid or turn down your gas pressure.
Nothing Coming Out of Tab
- Verify that you still have gas and that the regulator shows that the tank is getting pressurized.
- Stout taps need to be cleaned. Disconnect the gas and depressurize the tank and clean the tap by disassembling it and cleaning it with dish soap and rinsing throughly.
- Check your temperature in your kegerator. Your coffee could be frozen in the lines